Part 08 - Processes
One of the most important responsibilities of the kernel is to provide an interface to start processes, and to switch between processes seemlessly. We need to be able to stop a process from executing, save its state, start another process, and restore the first process later without it ever realizing it was not executing.
To play around with the code for yourself, see my git repo.
The Process Control Block
The Process Control Block (or PCB) is the data structure that holds all information about a process when it is not running so that it may be restored. This is what stores the PID and the name of the process, and any other metadata you could want. More importantly, each process is going to need its own stack, and its going to need its own stack pointer. These are the keys to saving and restoring the state of a process. Saving the state is as simple as pushing all of the registers onto the stack. Restoring the state is just popping the registers off of the stack. Here is the definition of the PCB:
typedef struct {
    uint32_t r0;
    uint32_t r1;
    uint32_t r2;
    uint32_t r3;
    uint32_t r4;
    uint32_t r5;
    uint32_t r6;
    uint32_t r7;
    uint32_t r8;
    uint32_t r9;
    uint32_t r10;
    uint32_t r11;
    uint32_t cpsr;
    uint32_t sp;
    uint32_t lr;
} proc_saved_state_t;

typedef struct pcb {
    proc_saved_state_t * saved_state; // Pointer to where on the stack this process's state is saved. Becomes invalid once the process is running
    void * stack_page;                // The stack for this proces.  The stack starts at the end of this page
    uint32_t pid;                     // The process ID number
    DEFINE_LINK(pcb);
    char proc_name[20];               // The process's name
} process_control_block_t;
Here you can see the pcb stores its stack page and a pointer to the saved state on its stack page. The proc_saved_state_t struct represents how the processes state will be saved onto its stack, r0 at the top, and lr at the bottom.
Now that we have defined the PCB, we need to set up the current process to have a PCB.
Initializing the Proccess System
In order to initialize this system, we must do the following:
- Initialize list of processes that want to run. This is called the Run Queue
- Allocate a PCB for the main process, and initialize it
- Mark that PCB as the current process
- Set the scheduler to go off
Here is the code to do this:
process_control_block_t * current_process;
...
void process_init(void) {
    process_control_block_t * main_pcb;
    INITIALIZE_LIST(run_queue);
    INITIALIZE_LIST(all_proc_list);

    // Allocate and initailize the block
    main_pcb = kmalloc(sizeof(process_control_block_t));
    main_pcb->stack_page = (void *)&__end;
    main_pcb->pid = NEW_PID;
    memcpy(main_pcb->proc_name, "Init", 5);

    // Add self to all process list.  It is already running, so dont add it to the run queue
    append_pcb_list(&all_proc_list, main_pcb);

    current_process = main_pcb;

    // Set the timer to go off after 10 ms
    timer_set(10000);

}
This creates a new PCB for the main process. The main process is given the name “Init”, so I will refer to it as such from now on. It sets this PCB as the currently running one.
The last thing this code does is sets the timer to go off in 10 ms. In the last part, we set up the system timer to simply print something once every 3 seconds. Now we are going to use it for something more important. Setting the timer here triggers this system.
Scheduling Processes
Since normal processes do not have a sense that they have to share the CPU, they are not likely to give it up until they are finished. In most cases, we must kick them off the CPU. We can do this by utilizing the system timer. We pick a specific Quantum of time that a process can use the CPU. Once the quantum is up, the timer will trigger an exception and from there we can switch another process in. As you can see above, the quantum I chose was 10 ms.
There are many different ways to schedule processes for optimal performance. For now, we will just use “round-robin” or “FIFO” scheduling, as it is increadibly easy in comparison. All we are going to do is add the current process to the back of the run queue and make the process at the front of the run queue the new current thread. Here is the code:
void schedule(void) {
    DISABLE_INTERRUPTS();
    process_control_block_t * new_thread, * old_thread;

    // If nothing on the run queue, the current process should just continue
    if (size_pcb_list(&run_queue) == 0) {
        ENABLE_INTERRUPTS();
        return;
    }

    // Get the next thread to run.  For now we are using round-robin
    new_thread = pop_pcb_list(&run_queue);
    old_thread = current_process;
    current_process = new_thread;

    // Put the current thread back in the run queue
    append_pcb_list(&run_queue, old_thread);

    // Context Switch
    switch_to_thread(old_thread, new_thread);
    ENABLE_INTERRUPTS();
}
As you can see, scheduling is fairly straightforward. This function is called by timer_irq_handler after 10 ms.
The real magic of scheduling is in the Context Switch, the action that actually swaps the running process. This is what switch_to_thread does.
Context Switching
A context switch involves saving all of a process’s registers onto its stack in a particular order, saving that stack pointer to the PCB, then loading the saved stack pointer of another PCB and popping off the registers. Here is the code:
switch_to_thread:
    push    {lr}
    push    {sp}
    mrs     r12, cpsr
    push    {r0-r12}
    str     sp, [r0]
    ldr     sp, [r1]
    ldr     r0, =#(10000)
    bl      timer_set
    pop     {r0-r12}
    msr     cpsr_c, r12
    pop     {lr, pc}
This saves lr, then sp on the stack. sp is not really neccessary to save, but it is a good place holder. Then we get the current program state register and save it into r12. r12 is a caller-save register, so its value need not be preserved. Then we push the general purpose registers. The next two instructions is where the actual “switch” occurs.
Since we passed in two PCBs, both of which have the saved stack pointer as its first field, we can access those shaved stack pointers by simply reading and storing from the memory addresses in r0 and r1. r0 is the pointer to the old thread, so the current stack pointer with all the save state is put into the saved state of the old PCB. r1 is the pointer to the new thread, so the new PCB’s saved state is stored into the stack pointer.
Before we completely restore the new thread, we reset the timer so that it will go off again in another quantum. Then we pop off all of the general purpose registers and restore the current program state register.
The last thing we must do is resume execution of the new process. We do this by loading the saved lr into the pc register, so execution will resume. It might seem wierd that this code stores the saved sp into lr. Since lr is caller-save, an existing process will just overwrite whatever we put there when it is time to return from the exception. A new process, however, jumps straight into the code without returning from an exception, as technically the new process never had an exception. The new process does not have anywhere to return to, so when it exits, it will use this lr to return. We can take advantage of this to have a process automatically jump to cleanup code when it dies.
Creating a new Process
Now that we can switch between processes, we need processes to switch between.
Creating a process involves allocating space for the PCB and the process stack, setting up the process stack to be context switched to, and adding it to the run queue. Here is the code:
void create_kernel_thread(kthread_function_f thread_func, char * name, int name_len) {
    process_control_block_t * pcb;
    proc_saved_state_t * new_proc_state;

    // Allocate and initialize the pcb
    pcb = kmalloc(sizeof(process_control_block_t));
    pcb->stack_page = alloc_page();
    pcb->pid = NEW_PID;
    memcpy(pcb->proc_name, name, MIN(name_len,19));
    pcb->proc_name[MIN(name_len,19)+1] = 0;

    // Get the location the stack pointer should be in when this is run
    new_proc_state = pcb->stack_page + PAGE_SIZE - sizeof(proc_saved_state_t);
    pcb->saved_state = new_proc_state;

    // Set up the stack that will be restored during a context switch
    bzero(new_proc_state, sizeof(proc_saved_state_t));
    new_proc_state->lr = (uint32_t)thread_func;     // lr is used as return address in switch_to_thread
    new_proc_state->sp = (uint32_t)reap;            // When the thread function returns, this reaper routine will clean it up
    new_proc_state->cpsr = 0x13 | (8 << 1);         // Sets the thread up to run in supervisor mode with irqs only

    // add the thread to the lists
    append_pcb_list(&all_proc_list, pcb);
    append_pcb_list(&run_queue, pcb);
}
The tricky part of the code is in these lines:
    new_proc_state = pcb->stack_page + PAGE_SIZE - sizeof(proc_saved_state_t);
    pcb->saved_state = new_proc_state;
...
    new_proc_state->lr = (uint32_t)thread_func;
    new_proc_state->sp = (uint32_t)reap;            // When the thread function returns, this reaper routine will clean it up
    new_proc_state->cpsr = 0x13 | (8 << 1);
These set up the new process’s stack so that switch_to_thread will work on it, even though it was never executing before.
The first two lines essentially sets the stack pointer. Remember that the stack grows down to lower addresses, so the stack starts at the top of the page: pcb->stack_page + PAGE_SIZE. Subtracting sizeof(proc_saved_state_t) “pushes” an empty saved state on to the stack
The next lines fill in some vital information. The first sets where the context switch should jump to once everything is restored. We want this to be the address of the function for this process. The second line sets this process to jump to cleanup code when it finishes. The third line sets up what the current program state register will contain. Since we are dealing with kernel threads, we want to stay in supervisor mode (mode 0x13), and we want IRQs to be enabled when this process starts (bit 7 = 0). We set bit 8 to disable a kind of exception that we are not using.
In theory, we could pass arguments to this function by placing values in r0-r3, but we do not need this functionality right now so I will save it for another time.
This reap function contains cleanup code. All it does is free all resources associated with a process, and then context switches immediately:
static void reap(void) {
    DISABLE_INTERRUPTS();
    process_control_block_t * new_thread, * old_thread;

    // If nothing on the run queue, there is nothing to do now. just loop
    while (size_pcb_list(&run_queue) == 0);

    // Get the next thread to run.  For now we are using round-robin
    new_thread = pop_pcb_list(&run_queue);
    old_thread = current_process;
    current_process = new_thread;

    // Free the resources used by the old process.  Technically, we are using dangling pointers here, but since interrupts are disabled and we only have one core, it
    // should still be fine
    free_page(old_thread->stack_page);
    kfree(old_thread);

    // Context Switch
    switch_to_thread(old_thread, new_thread);
}
Testing the System
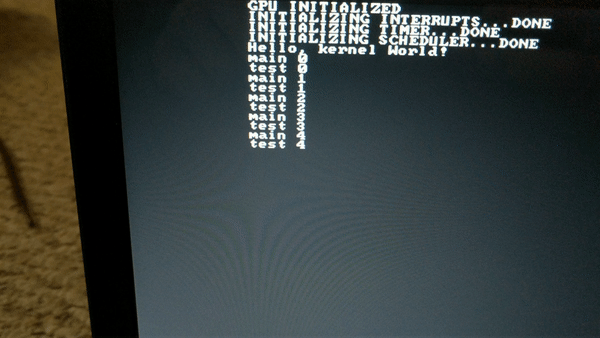
In kernel.c, add a call to process_init. Then above kernel_main, create the following function:
void test(void) {
    int i = 0;
    while (1) {
        printf("test %d\n", i++);
        udelay(1000000);
    }
}
and add this to the end of kernel_main:
	create_kernel_thread(test, "TEST", 4);

    while (1) {
        printf("main %d\n", i++);
        udelay(1000000);
}
Once you build, it should look something like this:
Now that we have real concurrency, we also can have data races! In order to help reslove that, next we are going to talk about locks.
Previous: Part 7 - Interrupts
Next: Part 9 - Locks